
How to Use Perplexity AI to Write Blog Posts Fast
Most blog posts do not take long to write because the writing itself is hard. They take long because the research phase eats half the day before a single sentence gets typed.
You open ten tabs. You read three articles that contradict each other. You lose track of which source said what. By the time you sit down to actually write, the energy that should have gone into the post has already been spent figuring out what the post should even say.
While researching options for a content site I was building last year, I started using Perplexity for the research stage specifically, not the writing stage. That distinction turned out to matter more than I expected. Used the right way, Perplexity does not just speed up writing. It restructures the entire workflow so that writing becomes the fast part instead of the slow part.
This guide covers exactly how that workflow works, step by step, along with what Perplexity is genuinely good at and where it still needs a human checking its work.
How This Workflow Was Tested This process was built and refined across multiple blog posts on different content sites over several months, covering topics in finance, productivity, and small business operations. The steps below reflect what consistently produced usable research and structure, not a single lucky run. Time estimates are based on actual posts written using this method.
Why Perplexity Is Different From a Regular AI Writing Tool
Most AI writing tools generate text based on patterns from training data. They are good at producing fluent sentences. They are not always good at telling you whether what they just wrote is current, accurate, or sourced from anywhere real.
Perplexity works differently because it searches the web in real time and shows you where each piece of information came from. Every answer comes with citations you can click through and verify. For blog writing specifically, that changes what the tool is useful for.
It is not the best tool for generating a finished, polished blog post in one shot. It is the best free tool for compressing the research phase from hours into minutes, which is usually the actual bottleneck.
One thing that became obvious after using it regularly: Perplexity is a research assistant that happens to write coherently, not a writing tool that happens to search the web. Treating it as the second thing leads to disappointing results. Treating it as the first thing is where the real time savings show up.
Step 1: Use Perplexity to Find Your Angle Before You Write Anything
Before opening a document, most people already think they know what their blog post is about. Often that initial idea is too broad or too obvious to actually rank or hold attention.
During keyword research for a niche website, I started asking Perplexity questions like “what are people most confused about regarding [topic]” or “what questions come up repeatedly about [topic] in online discussions.” The answers consistently surfaced angles that were more specific and more useful than my original idea.
For example, instead of writing a generic post about meal prepping, a query like “what makes people give up on meal prepping after a few weeks” returns a much sharper angle, the failure points, not just the basics everyone already covers.
Sample prompt that works well:
“What are the most common mistakes or misconceptions people have about [your topic]? List the top 5 with a brief explanation of each.”
This single prompt usually generates enough structure to build an entire post outline.
Step 2: Pull Current Data and Statistics Directly Into Your Research Doc
Blog posts that include specific numbers, dates, and verifiable facts tend to perform better and read as more credible than posts full of vague generalizations.
Perplexity is particularly strong here because the citations are visible immediately. You are not copying a number from a source you cannot verify. You can click through, confirm the figure is accurate and current, and note the source for proper attribution in your post.
After comparing this process to manual research, the time difference was significant. A statistic that might take 10 minutes to track down through general search, often across three or four pages before finding a reliable source, takes under a minute through Perplexity because it has already done that filtering.
Sample prompt:
“What is the most recent data available on [specific statistic, e.g., remote work adoption rates in small businesses]? Include the source and the date of the data.”
Always verify the date on anything Perplexity returns. AI tools, including Perplexity, can occasionally surface older data without making the timeframe obvious unless you specifically ask.
Step 3: Build Your Outline From Perplexity’s Structured Answers
This is where the actual time compression happens. Once you have your angle and your supporting data, ask Perplexity to help structure the post itself.
A prompt like asking it to outline the main sections a comprehensive post on the topic should cover, based on what people are actually searching for and asking, will usually return a structure that is more thorough than what most writers build on their own in a first pass.
From my experience, the outlines Perplexity generates are not perfect. They sometimes include sections that overlap or miss the specific angle you decided on in Step 1. But as a starting skeleton to edit rather than build from nothing, it removes a significant chunk of the blank page problem.
Sample prompt:
“Based on what people commonly search and ask about [topic], outline the sections a thorough, helpful blog post should cover. Keep it focused on [your specific angle from Step 1].”
What surprised me most about this step is how much faster the writing moves once a solid outline exists. The hardest part of writing is rarely the sentences. It is deciding what comes next. Removing that decision in advance changes the pace of everything that follows.
Step 4: Draft Each Section Using Your Own Voice, Not Perplexity’s Output Directly
This step matters more than any other in this guide, and it is the one people skip when they are in a hurry.
Perplexity’s answers are written in a fairly neutral, encyclopedic tone. That is useful for research. It is not useful as your actual blog content, both because it will not sound like you, and because publishing AI research output directly raises real concerns around originality and search quality.
The workflow that holds up is this: read Perplexity’s research and outline for a section, close the tab, and write that section in your own words based on what you now understand. You are not translating sentence by sentence. You are writing from comprehension, the same way you would write a section after reading a few articles and forming your own view.
One thing I noticed after doing this consistently: sections written this way read noticeably more natural than sections where I tried to lightly edit AI output. The difference is not subtle to a reader, and it tends to matter for how search engines evaluate the page over time.
Step 5: Use Perplexity to Fact-Check Your Draft Before Publishing
Once a draft is written, a useful final pass is feeding specific factual claims back into Perplexity to confirm accuracy before publishing.
This is especially important for posts involving numbers, dates, pricing, or anything that changes over time. A claim that was accurate when you started researching three days ago might already be slightly outdated by the time you finish writing.
Sample prompt:
“Is this claim accurate and current: [paste your specific claim]? If not, what is the correct or updated information?”
This step takes a few minutes per post and meaningfully reduces the risk of publishing something that is wrong or stale, which matters both for reader trust and for how the content holds up over time.
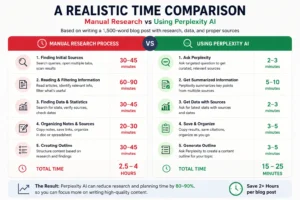
A Realistic Time Comparison
Writing Workflow: Before and After Perplexity
| Stage | Manual Research | Using Perplexity |
|---|---|---|
| Finding an angle | 30–45 minutes | 5–10 minutes |
| Gathering data/stats | 45–60 minutes | 10–15 minutes |
| Building an outline | 20–30 minutes | 10 minutes |
| Drafting (in your own words) | 90–120 minutes | 90–120 minutes |
| Fact-checking | 20–30 minutes | 5–10 minutes |
| Total | 3.5–4.5 hours | 2–2.75 hours |
The drafting time does not shrink much, because that is the part that should still come from you. What shrinks dramatically is everything around the drafting, which is usually where most of the wasted time actually lives.
A freelance writer I spoke with was producing roughly two blog posts a week using a fully manual research process. After adopting a Perplexity-first research workflow, she moved to three to four posts a week without increasing her hours, simply because the research overhead dropped so significantly.
Pros and Cons of Using Perplexity for Blog Writing
Pros:
- Citations are visible and clickable, so verifying sources is fast
- Significantly reduces research time compared to manual browsing
- Good at surfacing specific, narrow angles rather than generic topics
- Free plan covers the bulk of standard research needs
- Helps with both outline structure and fact-checking in one tool
Cons:
- Output tone is neutral and should not be published directly as blog content
- Occasionally returns outdated data without flagging the timeframe clearly
- Outlines sometimes need editing to match your specific angle
- Pro search queries are capped on the free plan
- Cannot replace the actual writing and voice that makes a post worth reading
Common Mistakes to Avoid
The biggest mistake beginners make is copying Perplexity’s answers directly into their draft and only changing a few words. This produces content that reads stiff, sounds like everyone else using the same tool the same way, and risks both originality and search performance issues over time.
Another common mistake is skipping the angle-finding step and going straight to drafting. Without a sharp angle, even a well-researched post ends up covering the same ground as a hundred other posts on the same topic.
A third mistake is trusting every statistic without checking the date. Perplexity is fast and generally reliable, but it is still worth a quick verification pass, especially on anything involving pricing, regulations, or fast-moving industries.
Who This Workflow Works Best For
This approach fits particularly well for solopreneurs, freelance writers, and small content teams who need to produce regular blog content without a dedicated research department.
It works less well for highly technical or scientific content where primary source verification needs to go deeper than what a single research session can responsibly cover. For medical, legal, or financial advice content specifically, treat Perplexity’s research as a starting point only, and verify claims through primary, authoritative sources before publishing.
For bloggers building a long-term content strategy around this kind of workflow, the complete SEO guide for beginners covers how to structure posts so the research speed gained here translates into actual search visibility. And if blogging is something you are considering as an income path itself, the guide to starting a blog and earning with AdSense walks through the broader setup.

Frequently Asked Questions
Q1. Can I publish content that Perplexity generates directly without editing?
This is not recommended. Perplexity’s strength is research and synthesis, not final blog voice. Content published without rewriting in your own words tends to read generically and can raise originality concerns. Use it for research, structure, and fact-checking, then write the actual content yourself.
Q2. Is Perplexity’s free plan enough for regular blog writing?
For most individual bloggers and small content operations, yes. The free plan covers standard search queries without a hard cap, with a daily limit specifically on Pro search mode, which offers deeper analysis. Most blog research needs are covered comfortably within the free tier.
Q3. How accurate is the information Perplexity provides?
Generally reliable because answers include clickable citations you can verify directly. That said, no AI research tool is error-free, and occasionally older data appears without a clear timestamp. Always verify specific numbers, dates, or claims before including them in published content, particularly for fast-changing topics.
Q4. Does using Perplexity for research affect SEO or originality scoring?
Using Perplexity for research itself has no direct impact on SEO, since the published content is what search engines evaluate. The risk comes specifically from publishing AI-generated text without rewriting it, which can affect both originality and how natural the content reads to actual readers.
Q5. How long does it take to get comfortable with this workflow?
Most writers see the time savings from the first post, since the structure is straightforward to follow. The workflow becomes faster and more intuitive after three or four posts, once you develop a sense for which prompts return the most useful angles and data for your specific niche.
Conclusion
Speed in blog writing rarely comes from writing faster sentences. It comes from removing the uncertainty that slows everything down before the writing even starts.
Perplexity does not replace the thinking, the voice, or the judgment that makes a blog post worth reading. What it removes is the hours spent hunting for information that should have taken minutes to find. Used with that distinction in mind, it turns blog writing from a half-day task into something that fits comfortably into a single focused session.
The workflow above is not complicated. Find the angle. Pull the data. Build the outline. Write it yourself. Check the facts. Five steps, used consistently, change how much content a single person can realistically produce in a week.